• 2.1 Subject List

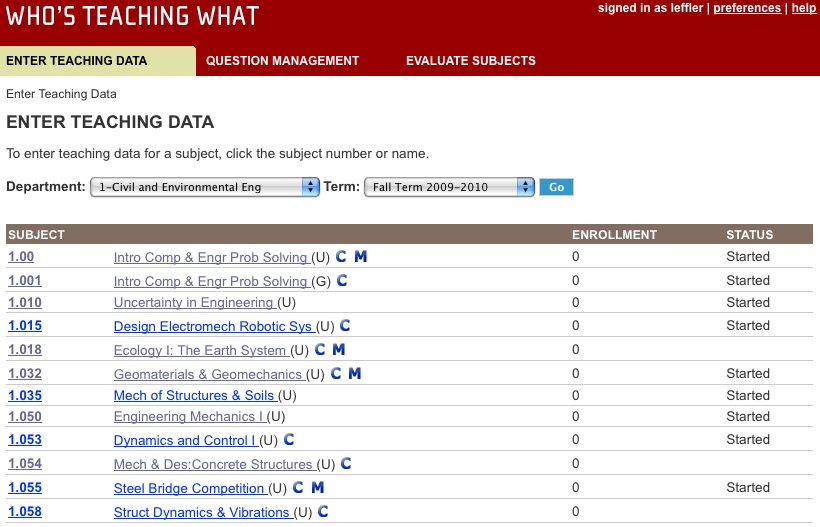
    The Enter Teaching Data page displays an interactive list of all the subjects offered within a given academic term for a specific department. This page allows access to a selected subject's teaching details (section, teacher and student enrollment information).

    The subject list has three columns:

    • Subject: Subjects display in ascending order by subject number. The name of the subject appears to the right of the subject number. If the subject is part of a cluster (e.g. a "joint" or "meets with" subject), a C  will display after the subject name. If the subject is the master within the cluster (responsible for entering teaching data), an M will also display.
    • Enrollment: The total number of students registered for credit or as listeners in the subject make up the enrollment number.
    • Status: A status of "Started" will display when at least one teacher has been added to the subject. Otherwise, the status will be blank.

    To access your department's subject list:

    1. Click the "Enter Teaching Data" tab at the top of the page. The color of the tab changes once you've selected it.
    2. Make sure the correct department displays in the Department box. If needed, select the correct term (the current term is the default) in the Term box.
    3. If you have made a change to department or term, click "Go." Subjects offered for the department and term selected will display. (If no changes are made, your subjects should already be displaying).
    4. To access the teaching details for a subject (where you'll add sections and teachers, assign students to sections, and edit any existing details) click the subject number or name. The Teaching Data Details page will display for the subject selected.


    enter-teaching-data.jpg


    • 2.2 Teaching Data Details Overview

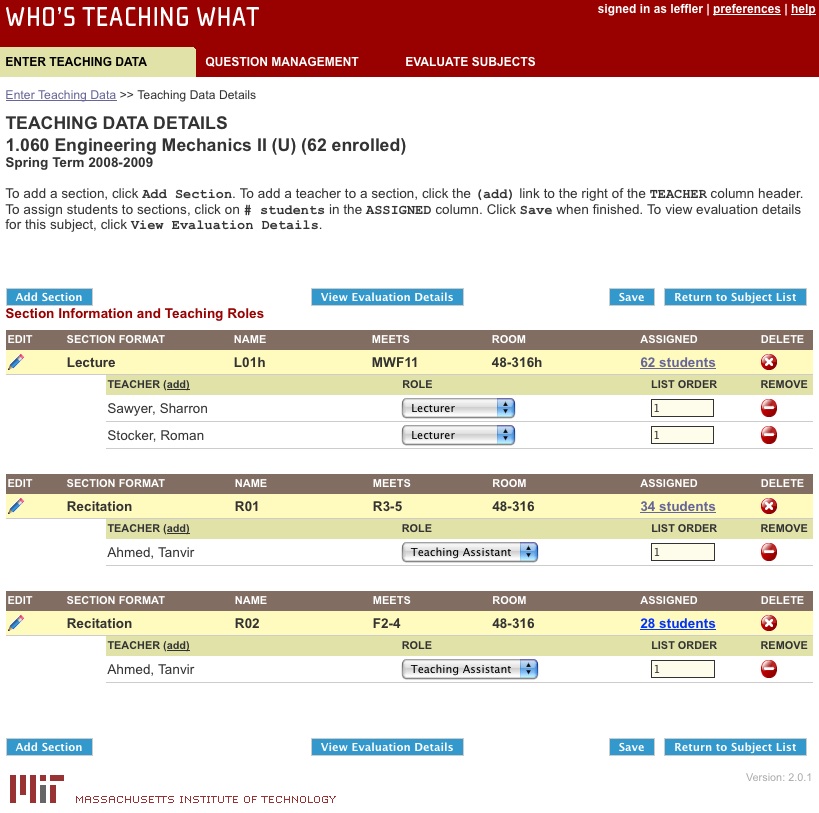
      Teaching data details are made up of the sections within the subject (e.g. lectures, recitations, labs), and the teachers within those sections (the names of the teachers as well as their teaching roles). Teaching data details also includes the names of students within the subjects and sections. Sections appear on yellow rows, and teachers display below the sections in which they teach. Teachers are listed beneath a green teacher row.

      Note: Sections within cluster subjects (e.g. "joints", "meets with" and "SWE" subjects) will display teaching data details in a slightly different format. More information on cluster subjects is included in the following section of this guide.

      • The following section information displays from left to right:
        • Section format. Examples of section formats include lecture, recitation, and lab.
        • Name. The name is your abbreviation for the section. Examples include L01, R02, B01.
        • Meets. The day(s) and time(s) the section meets (e.g. MWF1-2:30).
        • Room. The room in which the section takes place (e.g. 12-127, 4-102).
        • Assigned. The number of students assigned to that section. Initially the number is 0, and will change only if the user chooses to assign students to sections, an optional feature that allows the system to present a customized survey experience to the student and to collect and display section-specific survey results.
      • The following teacher information displays from left to right:
        • Teacher. Last name, first name of the teacher.
        • Role. Examples include lecturer, recitation instructor, etc.
        • List order. The order in which teachers display to students on the evaluation, as well as on the evaluation results.

      Many important functions can be performed or accessed from the Teaching Data Details page. From this page you can: add a section, edit a section, delete a section, add a teacher, change a teacher's role, change a teacher's list order, remove a teacher, and assign students to sections.

      teaching-data-details.jpg
    • 2.3 Cluster Subjects

      Cluster subjects are subjects in the same or different departments that meet together, and usually share the same teaching data details. Though these subjects also share the same (or similar) subject name, they have different subject numbers. Common cluster subject types are joint, meets with, and SWE.

      Clusters will typically have a master subject number; the department of that number is responsible for the teaching data details of the entire cluster. If you are viewing the Teaching Data Details page for a cluster subject, a C will display after the subject name and level. If the subject is the master within a cluster, an M will also display.

      Sections within cluster subjects will display under one of two possible headings:

      • Common to cluster. When the section is included in every subject number that makes up the cluster.
      • Unique to [subject number]. When a section is unique to a subject number: for example, a graduate section that is only offered within one subject within a cluster.

      When you add a section to a subject, you can select whether the section is common to the cluster (the most popular choice) or unique to a subject number within the cluster. The section will display under the proper heading on the Teaching Data Details page.

      teaching-data-details.jpg
    • 2.4 Adding Sections

      To add a section to subject:

      1. From the Teaching Data Details page, click the "Add Section" button.

      add-section-button.jpg

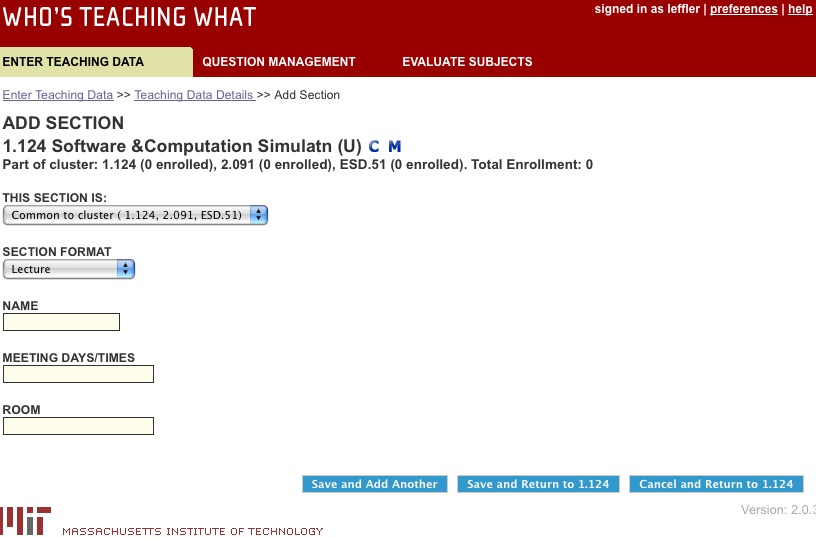
      2. The Add Section page displays.

      add-section.jpg

      3. If the section is being added to a cluster subject a "This section is" dropdown box will display. Select whether the section is common to all subjects in the cluster or unique to one subject in the cluster. For more information, see Cluster Subjects.

      4. Select the section format (e.g. Lecture, Recitation, Lab) from the drop down box. If your section format does not display here, it means you must set up the section format with a corresponding teaching role on the Teaching Roles page.

      5. Enter a name for your section (e.g. L01 for Lecture, R01 for Recitation). Section names must be unique within the subject.

      6. Enter the meeting days and times for your section (e.g. MWF1-2:30). Please format according to the following examples:

      • sections that meet for an hour: T2
      • sections that meet longer than an hour: R2-3.30
      • sections that meet at the same time on more than one day: TWR2
      • sections that meet different times on different days: TR11,F2
      • evening sections: T EVE (7-10 PM)
      • sections which begin or end on dates other than the normal term dates: MWF1-2.30 (BEGINS MARCH 28)
      • sections without a regular meeting time/room: *TO BE ARRANGED

      7. Enter the ROOM in which the section takes place (e.g. 12-127).

      Note: In order for teachers to be evaluated, the sections they teach must not be missing data in either the Meets or the Room field. You may put *TO BE ARRANGED in those fields if there is no set meeting time or room, but you should not leave them blank.

      8. Click the Save and Return to [Subject Number] button (or to add additonal sections to the same subject click Save and Add Another).

      9. The added section will display in a new row on the subject's Teaching Data Details page with an exclamation point symbol displayed before the section format. This symbol indicates that the Registrar's Office must approve the added section before it (and all teachers within it) can be evaluated. The approval process takes a day or two, and will update WTW automatically when it’s done; the exclamation point symbol disappears once Registrar approval has been granted. Meanwhile, you can continue adding teachers and assigning students to sections. If the Registrar's Office doesn't approve your request or has questions, they will contact you.

      reg-approval-section.jpg
    • 2.5 Adding Teachers

      To add a teacher to a section:

      1. From the Teaching Data Details page, choose the section (located in a yellow row) to which you'd like to add a teacher. Directly below this section is a green teacher row. Click "Add" to the right of "TEACHER" on this row.

      add-section-button.jpg

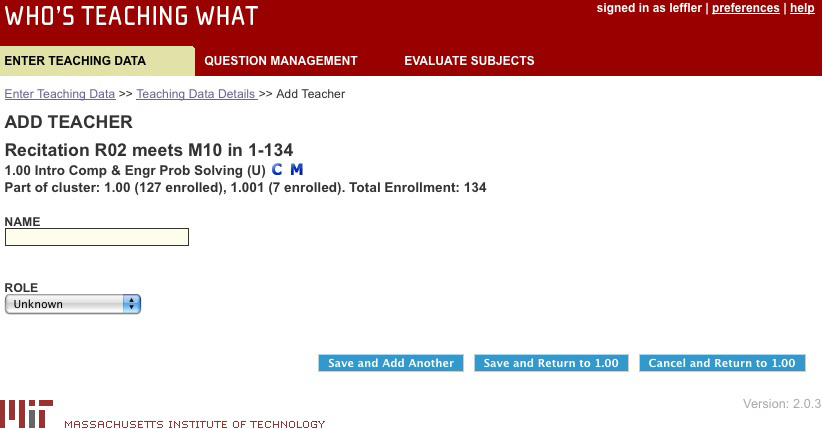
      2. The Add Teacher page displays.

      add-teacher.jpg

      3. Search for the name of the teacher you want to add by typing a full or partial name (last name, first name) in the name field.

      name-search.jpg
      • You must use a minimum of two letters.
      • If your search is unsuccessful, search again with more letters.
      • If your search remains unsuccessful, the teacher may be missing an MIT ID, a Kerberos ID, or both. All teachers entered in WTW must have both IDs - without them they cannot appear on the survey or access survey results. Review section 2.6 of this user guide for instructions on setting up a teacher with MIT and Kerberos IDs.

      4. Click on the name of the teacher you want to add. The name displays in the name field. Double check the name to be sure it is correct - the name you select will appear on the survey.

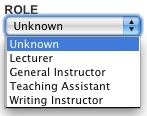
      5. Select the teaching role from the drop down box. The choice of roles will be limited to the roles configured under Preferences on the Teaching Roles page. If a role is missing, you can add it to your department's list of teaching roles. When you return to the Add Teacher page, the role will be available for selection.

      role-drop-down.jpg

      6. Click "Save and Return to [Subject Number]" or "Save and Add Another" if adding more than one teacher (you can add as many as you need to).

      7. The Teaching Data Details page displays with the added teacher listed in the appropriate section. If more than one teacher is assigned to the section, the added teacher will be listed last. You can change the order in which teachers are listed on the survey and survey results by changing the teacher list order.

    • 2.6 Kerberos / MIT IDs for Teachers and Students

      The Kerberos ID authenticates users of the MIT network.

      • For people who have an @mit.edu email address, the Kerberos ID is everything to the left of the @ sign; e.g., for smith@mit.edu, the Kerberos ID is smith.
      • For people with emails ending in anything other than mit.edu (@math.mit.edu or @wellesley.edu, for example), the Kerberos ID will often be something different, and there’s no guarantee that those individuals even have a Kerberos ID.
      • Kerberos IDs are used in the online evaluation system to:
        • enable teachers to be added to WTW and thus be evaluated.
        • authenticate students so they can complete evaluations online.
        • authenticate students, teachers and departmental staff so they can view and download evaluation results.
      • Getting a Kerberos ID, whether for a student or for a teacher, is not an instantaneous process; it can take up to a few days. They must first obtain an MIT ID.

      Getting an MIT and Kerberos ID for a teacher

      If you can't find a teacher's name in the WTW teacher lookup, please check with sehelp@mit.edu to verify that they are indeed missing and not just listed under an unexpected name. If they're really not in the lookup, it is because they are missing a Kerberos ID, and most likely an MIT ID as well. To get a teacher into the lookup, you must do the following:

      1. Fill out the Sponsored Guest Account form at https://ist.mit.edu/accounts/guest/. You will need their name, month and day of birth, and their guest type (new contractor/temp/consultant, new visitor/guest, or extending existing student/staff account).
      2. You will receive a reply email (within two days) from IS&T containing the MIT ID and instructions for creating a Kerberos account. Forward this to the teacher and urge them to complete it as soon as possible.
      3. The day after the teacher creates a Kerberos account, they should appear in the WTW teacher lookup.

      How a Student Gets an MIT and Kerberos ID

      All registered students will have already received a 9-digit MIT ID number printed on their MIT ID card. If they do not have an MIT ID card, they can call the MIT Registrar's Office at (617) 258-6409 or email records@mit.edu to retrieve their ID number. They will need the ID number in order to get a Kerberos ID.

      Once they have the ID number, go to https://accounts.mit.edu/register/.

    • 2.7 Assigning Students to Sections Overview

      Please keep in mind that assigning students to sections is optional. It is only necessary if one or more of these conditions are true:

      • you want to keep track of student section assignment data in WTW,
      • you want to limit who students can evaluate so they won't be able to rate someone who didn't teach them, and/or
      • you want to be able to break out overall results on the evaluation reports for individual sections as if they were separate subjects, e.g. to see how students in Recitation R03 rated the subject as a whole.

      Students who are not assigned to any section may evaluate instructors in ALL sections.

      When a student is assigned to a particular section (e.g. recitation), it becomes the only section, of that type, in which he/she can evaluate instructors. The student will still able to evaluate instructors in other types of sections (e.g., lecture, lab, design, etc.).

      Grade Sheets and Assigning Students to Sections

      Sectioning students in WTW will not have any effect on grade sheets except when:

      • a department has previously requested that a subject is set up in MITSIS by the Registrar’s Office to produce grade sheets by section, and/or
      • the department actively maintains the sections in MITSIS.

      If your department meets the above conditions, then your MITSIS section assignments will be reflected in WTW and vice versa.

      How to Assign Students to Sections

      1. You can access the Assign Students to Section page from the Teaching Data Details page for your subject. Click the # students link in the assigned column to the right of the section you want to assign students to.

      2. The Assign Students to Section page will display.

      add-section-button.jpg


    • 2.8 Assigning Students to Sections Details

      Before assigning students to sections, you should first read the overview in section 2.7 above. Once you understand the basic rules, you can assign students to sections by following these steps:

      1. Access the Assign Students to Section page from your subject's Teaching Data Details page. Find the section you want to assign students to (located in the yellow section row), and locate the # students link on that row in the assigned column. The number of students appearing in the "assigned" column for a section tells you how many students have been assigned to that section. This number will always be 0 before sectioning begins unless you are one of the few departments using a section grade sheet.

      Note: Since students can be assigned to multiple sections within a subject, the total number of assigned students per section will not necessarily match the subject's Enrollment number on the Enter Teaching Data page.

      add-section-button.jpg

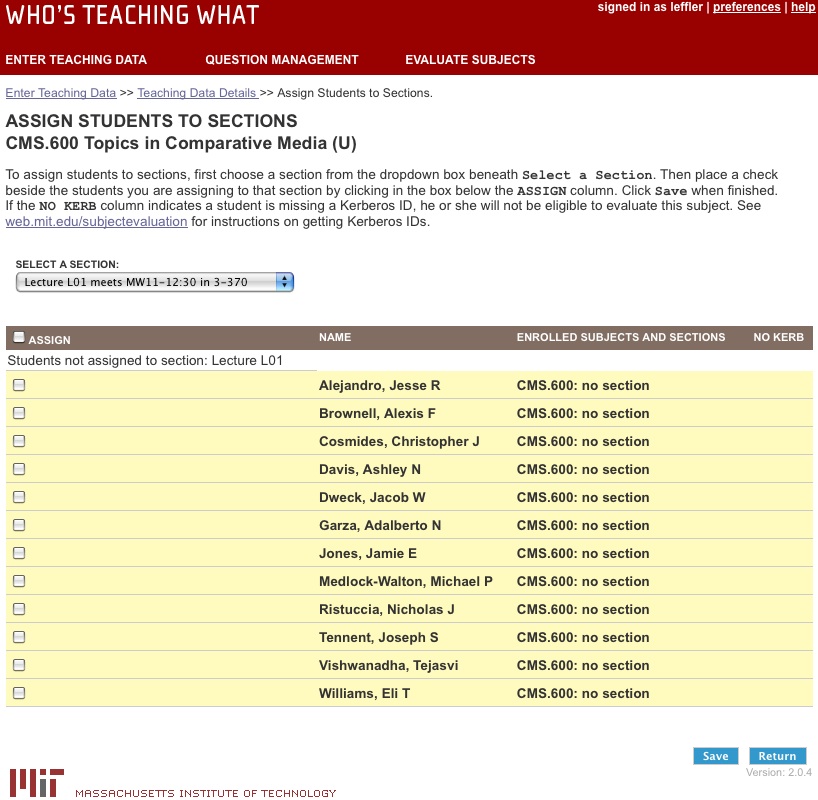
      2. Click the # students link. The Assign Students to Section page displays. This page contains a list of all students enrolled in the subject.

      assign-students-to-sections.jpg

      3. View the selection appearing in the "select a section" dropdown box. The entry should be the section you chose on the Teaching Data Details page. If you want to select another section to assign students to, you can access all the subject's sections via this dropdown box.

      4. View the list of students. The columns, from left to right, are:

      • Assign. Contains a checkbox you'll use to assign the student to the section.
      • Name. The student's last and first name.
      • Enrolled students and sections. The subject number and the sections the student is already enrolled in, if any.
      • No kerb. Indicates if the student doesn't have a Kerberos ID. If a checkmark displays in this column, you can help the student obtain a Kerberos ID with instructions in section 2.6 of this guide.

      5. To assign a student to the section of your choice, click on the checkbox to the left of the student's name. Repeat for all students you are assigning to the section. If you are assigning all the students enrolled in the subject to a section, you can avoid unnecessary clicks by clicking the "assign" checkbox in the gray row above the student list.

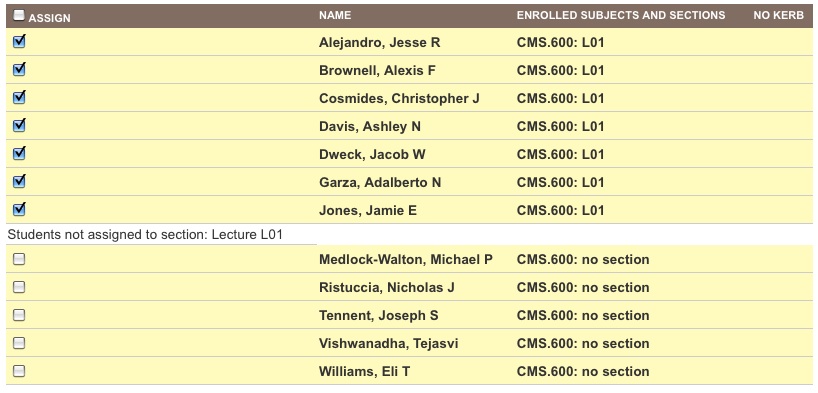
      6. When all the students you are assigning to the section have been checked, click "save." The page will display your checked students with the section(s) they've been assigned to in the "enrolled subjects and sections" column. To unassign a student from a section, click on the checked box beside the student to remove the checkmark. Press "save."

      assigned-students.jpg

      7. Click "return." If you want to cancel your entries before saving, you may also click "return."

      8. The Teaching Data Details page displays. For the section to which you've been assigning students, the # students has changed to reflect the number of students currently assigned to the section.

      section-with-students.jpg


    • 2.9 Editing Sections

      To edit a section:

      1. From the Teaching Data Details page, click the "Edit Section" icon to the left of the section you want to edit.

      add-section-button.jpg

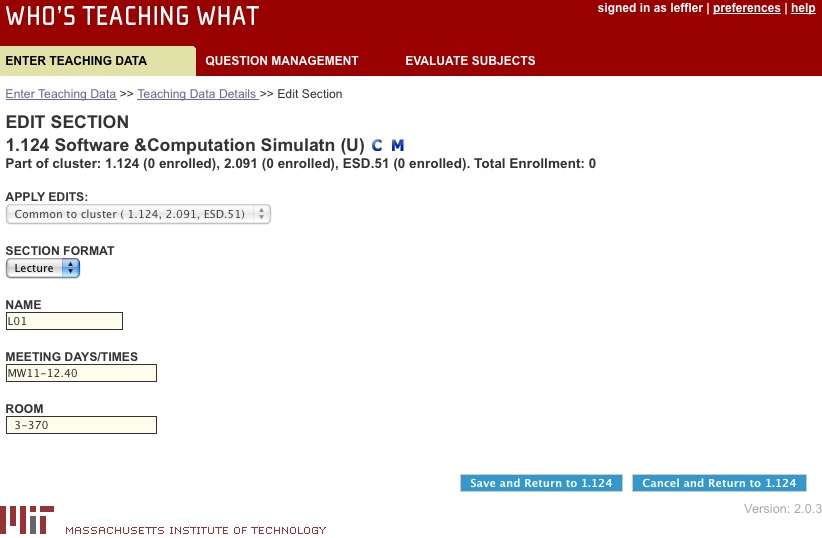
      2. The Edit Section page displays.

      edit-section.jpg

      3. If the section being edited is part of a cluster subject, an APPLY EDITS drop down box will display. The "grayed out" entry in the box will tell you whether the section is common to all subjects in the cluster or unique to one subject in the cluster. While in the Edit Section mode, you will be unable to change this entry.

      4. To change the section format, use the drop down box. Your choices will be limited to section formats of the same MITSIS type (a system identifier for grouping section formats), which simply means that not all section formats will display for selection. If, for example, you want to change a Lecture section format to a Recitation, you must first delete the section, and then add a Recitation in place of it.

      5. To change a name for your section (e.g. L01 for Lecture, R01 for Recitation) type over the existing entry. Section names must be unique within the subject.

      6.To change the meeting days and times for your section (e.g. MWF1-2:30) type over the existing entry. Please format according to the following examples:

      • sections that meet for an hour: T2
      • sections that meet longer than an hour: R2-3.30
      • sections that meet at the same time on more than one day: TWR2
      • sections that meet different times on different days: TR11,F2
      • evening sections: T EVE (7-10 PM)
      • sections which begin or end on dates other than the normal term dates: MWF1-2.30 (BEGINS MARCH 28)
      • sections without a regular meeting time/room: *TO BE ARRANGED

      7. To change the room in which the section takes place (e.g. 12-127) type over the Room entry.

      8. Click the "Save and Return to [Subject Number]" button.

      9. The edited section will display in its original row on the subject's Teaching Data Details page. If the meeting days/times or room fields have been edited, the section will display with an exclamation point symbol appearing before the section format. This symbol indicates that the Registrar's Office must approve those section changes before the section (and all teachers within it) can be evaluated. The exclamation point symbol disappears once Registrar approval has been granted.

      reg-approval-section.jpg
    • 2.10 Changing a Teacher's Role Within a Section

      A teacher's role (e.g. Lecturer, Teaching Assistant, Instructor) within a section can be changed.

      1. From the Teaching Data Details page, locate the teacher whose section teaching role you'd like to change.

      add-section-button.jpg

      2. In the role column, click the up/down arrows to the right of the ROLE drop down box. A list of teaching roles that have been set up for this particular section format (e.g. Lecture, Recitation) displays. If you do not see the teaching role you are looking for, you must set up the teaching role under Preferences. Once completed, the teaching role will display in the role dropdown list.

      3. Select the new teaching role from the role dropdown list.

      teacher-role-dropdown.jpg

      4. Click "Save" at the top or bottom of the page.

      5. The teaching role has been changed.

      changed-teaching-role.jpg
    • 2.11 Changing a Teacher's Sort Order Within a Section

      The sort order determines how the teachers' names will be displayed to students on the online subject evaluation. When accessing the online evaluation, students will be asked to select a section of the subject, and to pick from a list of teachers (if more than one) within that section. By default, the sort order is automatically determined by the order in which you add teachers to a section. However, some teachers consider the order in which they're listed on evaluations very important, and by changing the sort order in WTW you can change the order in which teachers will display on the online evaluation.

      1. From the Teaching Data Details page, locate the teacher(s) whose list order you'd like to change.

      changed-teaching-role.jpg

      In the sort order column, you will notice that the numerical order is listed in units of 10. This numbering scheme makes it easy to change the order of teachers. In the display above, if you wanted to sort David Orr after Lee Leffler and before Rosanne Santucci, you'd simply change Orr's sort order from 30 to any number between 11 and 19.

      2. In the sort order column, change the numbering of the teachers to reflect your new list order.

      4. Click "Save" at the top or bottom of the page.

      5. The sort order has been changed.

      list-order-changed.jpg
    • 2.12 Deleting a Section

      To delete a section:

      1. From the Teaching Data Details page, click the "Delete" icon to the right of the section you want to delete.

      add-section-button.jpg

      2. A message box will display prompting you to click OK if you're sure you want to delete the section.

      are-you-sure-delete.jpg

      You cannot delete a section if all of the following are true:

      • Teachers in the section have been flagged for evaluation during the term.
      • The subject has been flagged for evaluation during the term.
      • The survey start date for the flagged evaluation has passed.

      If that is the case, a message will display at the top of the page stating that the Delete action was unsuccessful and why.

       delete-unsuccessful.jpg

      3. Otherwise, the section will be deleted, and will disappear from the Teaching Data Details page. A Delete Successful message will display.

    • 2.13 Removing Teachers from Sections

      You can remove a teacher from a section except when the teacher was flagged for evaluation in a survey window for which the start date has passed. At that point, the teacher cannot be removed from the section, because responses to questions about that teacher may exist in the database and appear on reports of survey results.

      1. From the Teaching Data Details page, locate the teacher you'd like to remove from the section.

      add-section-button.jpg

      2. Click the "Remove" icon to the right of the teacher you want to remove.

      3. A message box will display asking whether you are sure you want to remove the teacher.

      are-you-sure-remove.jpg

      4. Click "OK."

      5. If the survey start date has passed and the teacher was flagged for evaluation, the following message will display:

       delete-unsuccessful.jpg

      Otherwise, the teacher will be removed from the section...

      teacher-removed.jpg

      ...and a message will display stating that the teacher has been successfully removed.

      delete-successful.jpg
    • 2.14 Uploading Data to WTW

      Some departments build and maintain their own applications to support teaching processes (such as grade sheets and class lists). The data in these systems includes most, if not all, of the data required by WTW to manage online subject evaluations.

      To avoid double entry of data by departments, all of the teaching data that can be edited within the WTW web interface can be supplied via a data upload of a tab-delimited file to WTW.

      The Upload feature is recommended only to advanced database users within departments that keep this data. If you would prefer to upload your data, download the PDF instructions for uploading data.