• 4.1 Subject List

    Like the Enter Teaching Data page, the Evaluate Subjects page displays an interactive list of all subjects offered within a given academic term for a specific department. From this page you can access details for subjects in your department and indicate:

    • which subjects and teachers to evaluate
    • which question groups will appear on evaluations
    • the order that question groups will appear on the evaluation

    To access your department's Evaluate Subjects page:

    1. Click the "Evaluate Subjects" tab at the top of the page. The color of the tab changes once you've selected it.

    2. Make sure the correct department displays in the Department box. This field should default to your department. If you work in more than one department, select the department from the drop down list. If needed, select the correct term (the current term is the default) in the Term box.

    3. Make sure the correct survey window (e.g. Fall 2009 End of Term) displays by selecting from the drop down box. There may be more than one survey window in the drop down list, because a department may have both mid-term and end-of-term evaluations.

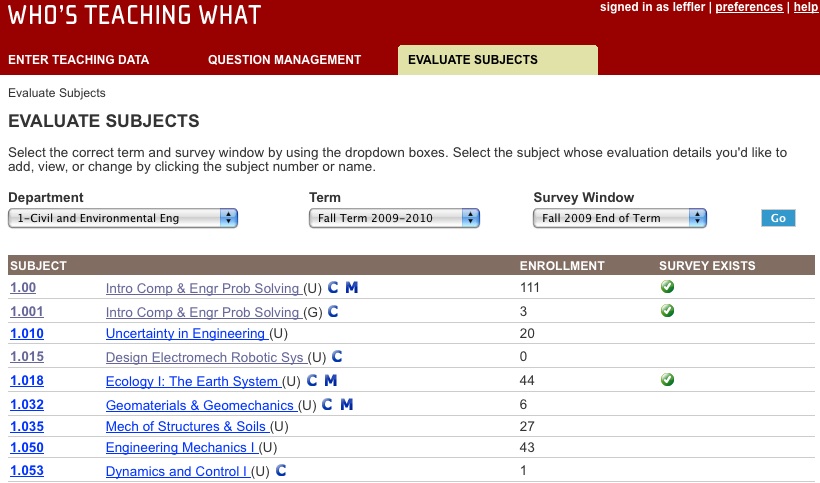
    3. If you have made a change to department, term or survey window, click "Go." The Evaluate Subjects page displays for the specified department, term and survey window:

    evaluate-subjects.jpg

    The Evaluate Subjects list has three columns:

    • Subject: Subjects display in ascending order by subject number. The name of the subject appears to the right of the subject number. If the subject is part of a cluster (e.g. a "joint" or "meets with" subject) a C will display after the subject name. If the subject is the master within the cluster (responsible for entering teaching data) an M will also display.
    • Enrollment: The total number of students registered for credit or as listeners in the subject make up the enrollment number.
    • Survey exists: A green checkmark icon appears in this column when the corresponding subject:
      • has been flagged for evaluation
      • has at least one survey question assigned
      • has obtained Registrar approval for any new sections (or any room and time changes to existing sections) that are to be evaluated this term

    4. To access the evaluation details for a subject (where you'll flag subjects and teachers for evaluation, assign or remove question groups, and change the sort order of assigned question groups) click the subject number or name. The Evaluation Details page will display for the subject selected.

  • 4.2 Selecting a Survey Form

    On the Evaluation Details page, you will assign standard questions (called a survey form) that will be asked on the evaluation, and indicate whether a subject (and teachers) will be evaluated. On this page, you can also assign your own questions to an evaluation.

    You can get to the Evaluation Details page in one of two ways:

    • By clicking the View Evaluation Details button on the Teaching Data Details page.
    • By clicking on the subject name or number on the Evaluate Subjects page. (Be sure your filters are set to the correct term and survey window on the Evaluate Subjects page.)

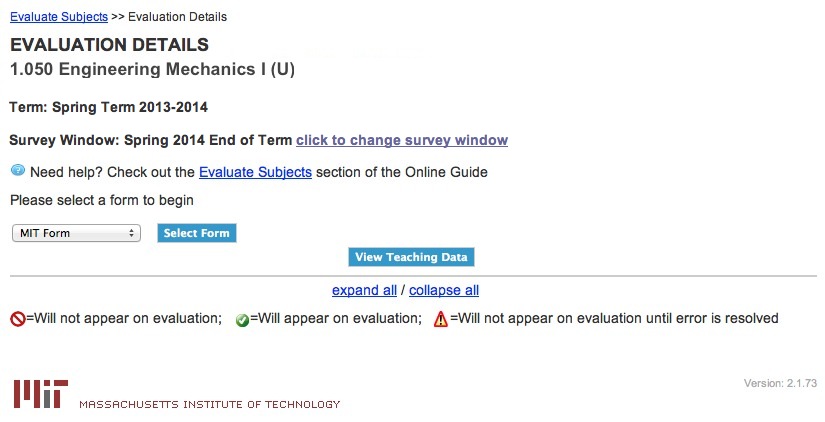
    The first time the Evaluation Details page displays, it will look like this:

     select-form.jpg

    To select a survey form:

    . Click the Select Form button. The standard MIT questions will be applied to the subject’s evaluation.

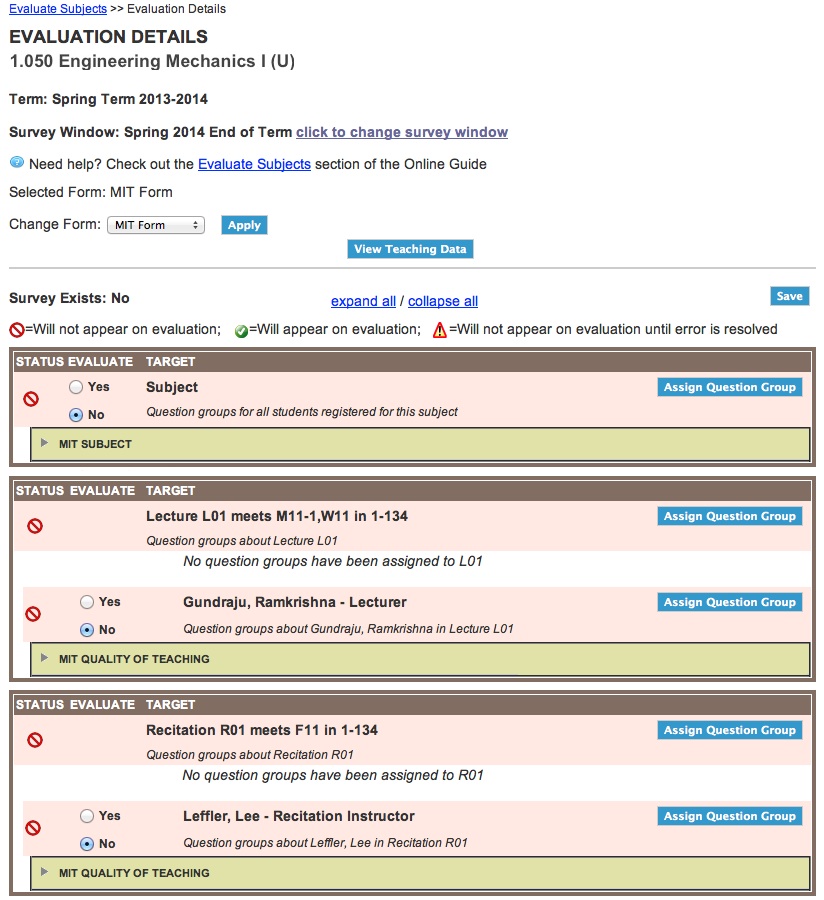
    The subject, section(s), and teacher(s), as set up on the Teaching Data Details page, will display in their own rows (these are pink). Beneath the subject and teacher rows are additional rows (green) representing each standard group of questions that will appear on the evaluation, if you select the subject and teacher(s) for evaluation.

     applied-form.jpg
  • 4.3 Selecting Subjects and Teachers for Evaluation

    Once you have selected the survey form for a subject's evaluation, you must indicate that the subject will be evaluated, and which teachers within a subject's sections will be evaluated.

    After selecting your survey form, the Evaluation Details page looks like this:

     applied-form.jpg

    To select the subject and teachers for evaluation:

    1. Select the Yes radio button to the left of the word Subject in the pink Subject row. The status icon (located in the status column, in the Subject row) will change from "will not appear on evaluation" to "will appear on evaluation". When you select a subject for evaluation, all sections within the subject are automatically flagged for evaluation.

    2. Select the "Yes" radio button to the left of the teacher's name in the pink Teacher row. Do this for all teachers you'd like evaluated. If all conditions have been met for the teacher to be evaluated, the status icon (located in the status column, in teacher row) will change from "will not appear on evaluation" to "will appear on evaluation".

    If the teacher row is highlighted, and the staus icon changes to "will not appear on evaluation until error is resolved", one or more errors must be resolved before the teacher will appear on the evaluation.

    view-errors.jpg

    To see the errors, click on the view errors link. Errors that must be resolved include:

    • No teaching role has been assigned to teacher
    • Subject radio button is not selected for evaluation (in order to select teachers for evaluation, you must also select the subject for evaluation)
    • Section containing the teacher is missing a room and/or time
    • Registrar must approve a change to the section containing the teacher

    NOTE: If a teacher is missing from the Evaluation Details page, click the View Teaching Data button (located above and below evaluation details). The Teaching Details page will display for the subject. Add the teacher and click the View Evaluation details button on the page. This returns you to Evaluation Details, where you'll see your added teacher which can be selected for evaluation.

    3. When the subject and all teachers you'd like evaluated have been selected, click the Save button (right side, above and below evaluation details). The Evaluation Details page displays with the following message at the top:

    changes-saved-successfully.jpg

    4. You can return to the Evaluate Subjects page by clicking the Evaluate Subjects "breadcrumb" or the "Evaluate Subjects" tab at top of page:

    Or you can remain on the Evaluation Details page and assign question groups to subject, sections and teachers.

  • 4.4 Assigning Question Groups to Subjects, Sections and Teachers

    Some groups of questions will be automatically assigned to your subjects and teachers. These are the Institute-wide question groups. The HASS and Science & Engineering paper survey forms that have historically been used within MIT are no longer in use. You will only have to add additional question groups that address areas not covered by the existing paper form questions. An example of a question group that will be automatically assigned to all of your evaluated teachers is the Quality of Teaching question group.

    To assign question groups to a subject, section or teacher:

    1. From the Evaluation Details page, click the Assign Question Group button located on the far right of the pink subject, section, or teacher row. Example: In the image below, you can assign question groups to Subject 1.050, Lecture L01, Lecturer Ramkrishna Gundraju, Recitation R01, and Recitation Instructor Lee Leffler by clicking the appropriate Assign Question Group button.

    Cluster subjects will display as they do on the Teaching Data Details page. More information on cluster subjects is available in this guide.

    assign-qgs-to-eval.jpg

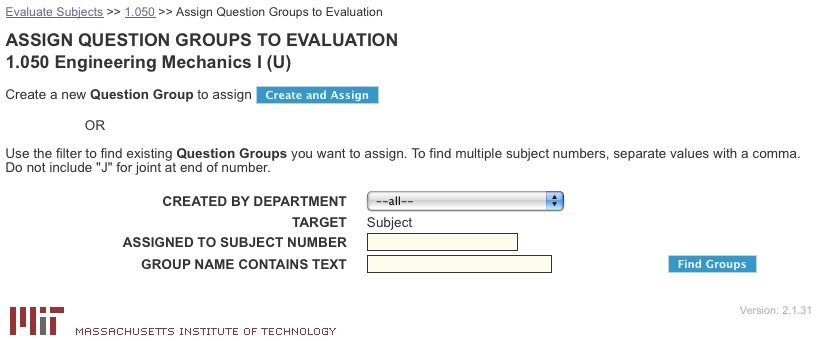
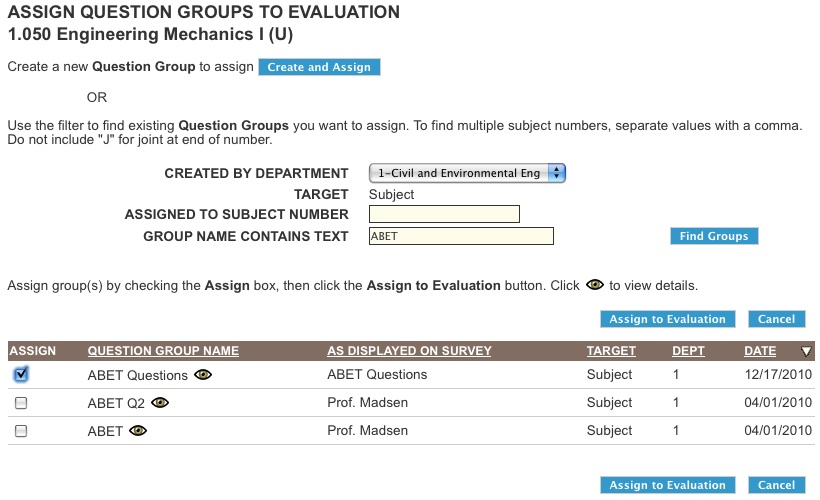
    2. The Assign Question Groups to Evaluation page displays. If question groups have been previously created, you can find question groups for the target (subject, section, teacher) you've chosen, by entering your search criteria in the fields, and clicking the Find Groups button. If a question group must be created before it can be assigned to an evaluation, click the "Create and Assign" button.

    Assign question groups

    3. If you have found an existing question group to assign to an evaluation, select the group by clicking the box to the left of the question group name in the assign column, and click the "Assign to Evaluation" button.

     assign-existing-group.jpg

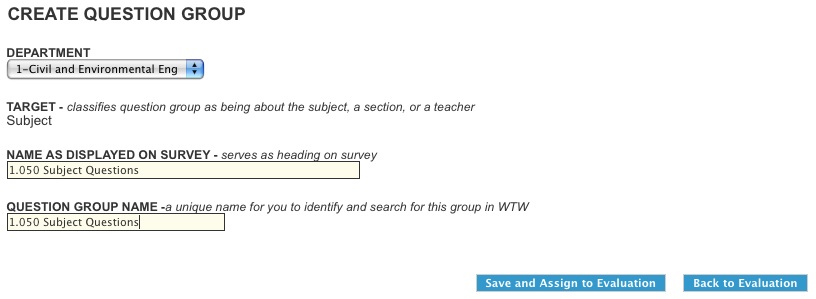
    If you have created a new question group, click the Save and Assign to Evaluation button, then assign questions to the group.

     assign-new-question-group.jpg

    4. View the Evaluation Details page to see your assigned question group beneath the appropriate target (subject, section, or teacher). You can edit or remove the group if needed by clicking the "Edit" or "Remove" buttons.

     added-question-group-on-eval-details.jpg

    Instructions on finding, creating, and assigning question groups and questions can be found in the Question Management section of this online guide.

  • 4.5 Previewing the Survey

    Once a subject is flagged for evaluation and questions have been assigned, you can preview the survey to see it exactly as students will view it.

    To preview a survey:

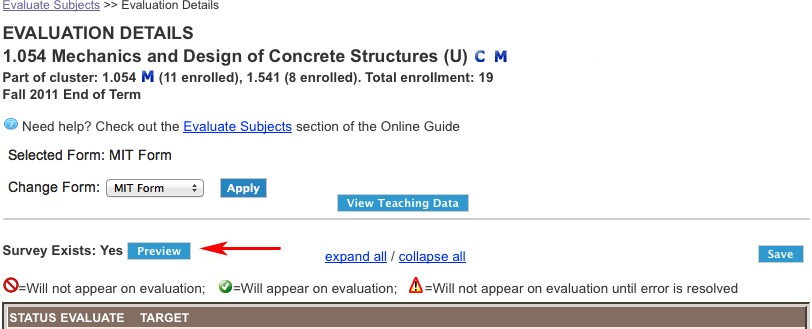
    1. From the Evaluation Details page, click the Preview button. In order for the Preview button to display, you must first flag the subject for evaluation, and assign at least one survey question.

     survey-preview-copy.jpg

    2. The Welcome page of the Online Subject Evaluation Engine displays in a separate window. (You can copy the address of this window and send it to any instructors who would like to see a preview but do not have access to WTW.) Click on the subject number/name link.

    welcome.jpg

    3. Select the instructors whose survey questions you'd like to preview. Click the "Proceed to Survey" button at bottom right of page.

    select-instructors.jpg

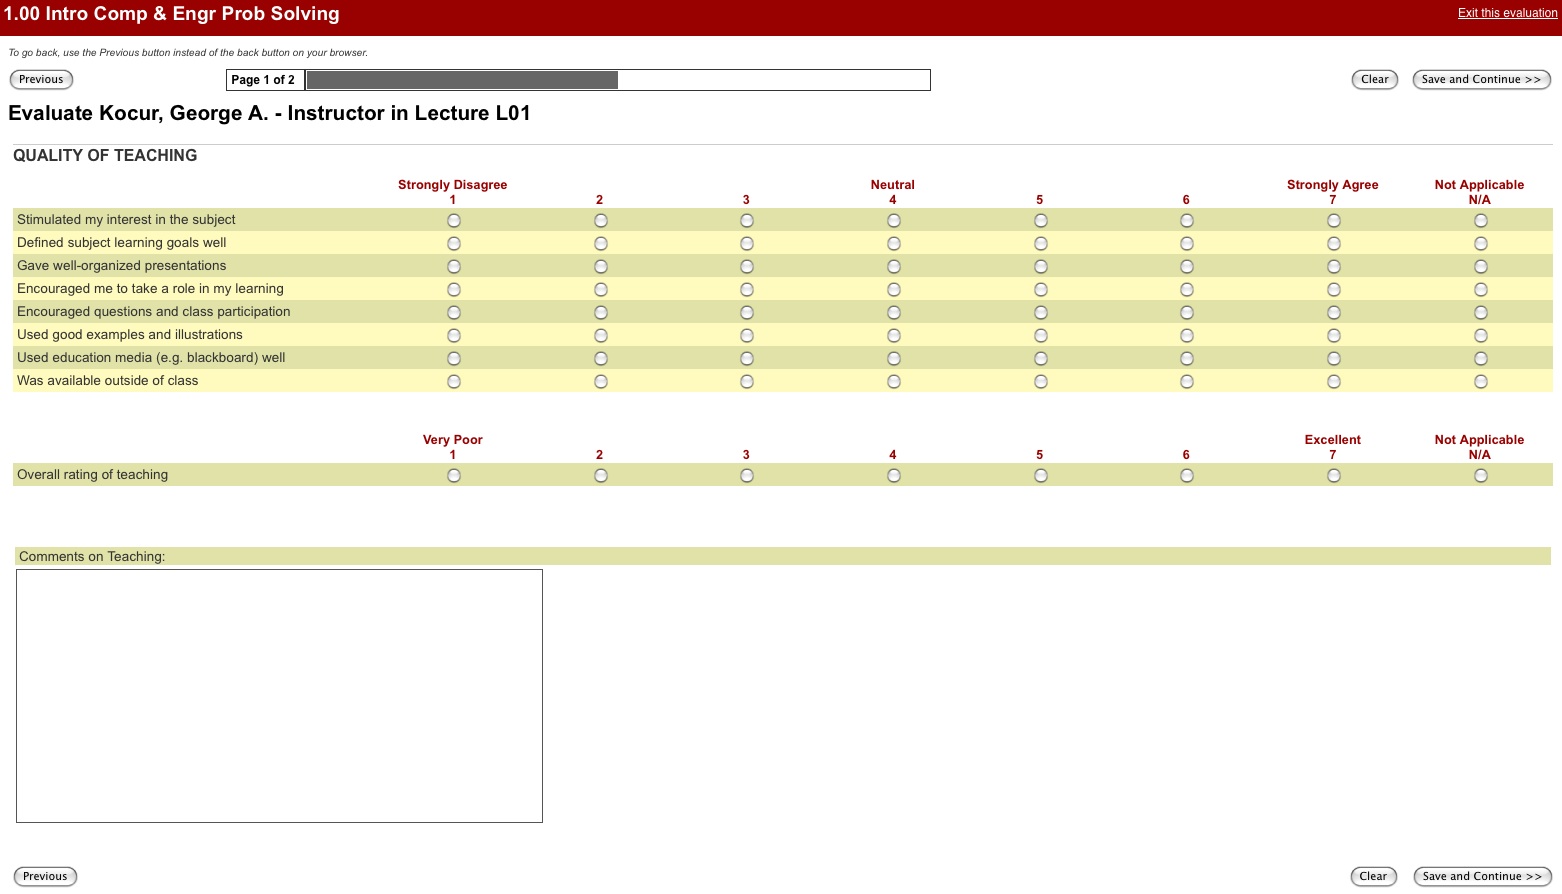
    4. You can view each page of the survey by clicking the Save and Continue button at top and bottom right of page.

    survey_questions.jpg

    5. Once all pages of the survey have been viewed, the Welcome page will redisplay. You can close the Survey Preview window (click the X in tab or window) once you have finished previewing the survey

  • 4.6 Changing the Order of Question Groups

    You can change the display order of your question groups for a subject, section, or teacher. The order in which you sort determines the order in which question groups appear on the evaluation, and on the report. Standard question groups assigned Institute-wide (MIT Form) cannot have their sort order changed. These standard question groups will always appear before your extra questions on the evaluation.

    To change the order of your question groups:

    1. From the Evaluation Details page, locate the target (subject, section or teacher) whose question group sort order you'd like to change.

     qg-sort-order.jpg

    2. Using the blue Up and Down arrows on the right side of the green question group row, click to move a question group higher or lower in the list. In the display above, if you wanted to sort question group, 1.050 SUBJECT QUESTIONS to appear after the ABET QUESTIONS on the evaluation, you could click the Up arrow on the ABET QUESTIONS row, or the Down arrow on the 1.050 SUBJECT QUESTIONS row.

  • 4.7 Editing and Removing Question Groups from Evaluations

    You can edit your question groups (which includes adding and deleting questions) before the start of an evaluation window, except when a group has appeared on previous evaluations. You can also remove your question groups before the start of an evaluation window. However, once the evaluation period starts, question groups cannot be altered or removed. You cannot edit or remove MIT's standard question groups.

    In the image below, the question group named 1.050 SUBJECT QUESTIONS can be edited (a blue Edit button displays) because the question group has not appeared on previous surveys, and because the evaluation window has not yet opened. This question group can be removed from the evaluation (a blue Remove button displays) because the evaluation window has not yet opened. The question group named ABET QUESTIONS cannot be edited (blue edit button does not display) because the question group has appeared on previous evaluations and its questions have answers. The question group can be removed because the evaluation window has not yet opened.

     qg-sort-order.jpg

    To edit a question group:

    1. Click the Edit button to the right of the question group you want to edit. NOTE: If the Edit button does not display, the question group has appeared on previous surveys and has answers, or the evaluation window has started.

    2. The Question Group Details page displays. Follow the instructions for editing a question group in the Question Management section of this guide.

    3. Click the Back to Evaluation button to return to the Evaluation Details page.

    To remove a question group:

    Click the Remove button to the right of the question group you want to remove. If the Remove button does not display, the evaluation window has started. You cannot remove MIT's standard question groups, and a Remove button will not display beside these question groups.

  • 4.8 Composing and Sending Student Email Notifications

    You can compose and send email reminders to eligible students who have not responded to a survey. To receive an email reminder, a student must be registered for credit or as a listener, have an MIT email account, and have not yet completed an evaluation. Eligible students in the subjects you select will receive emails, but student names will remain confidential. The Office of Faculty Support will also send several email reminders to students who are eligible to respond to a survey but who have not yet done so.

    To compose and send student email notifications:

    1. On the "Evaluate Subjects" tab at the top of the page, click "Send student email notification."

    send-email-tab.jpg

    The Select Department, Term and Survey Window page displays.

    select-dept-term-window.jpg

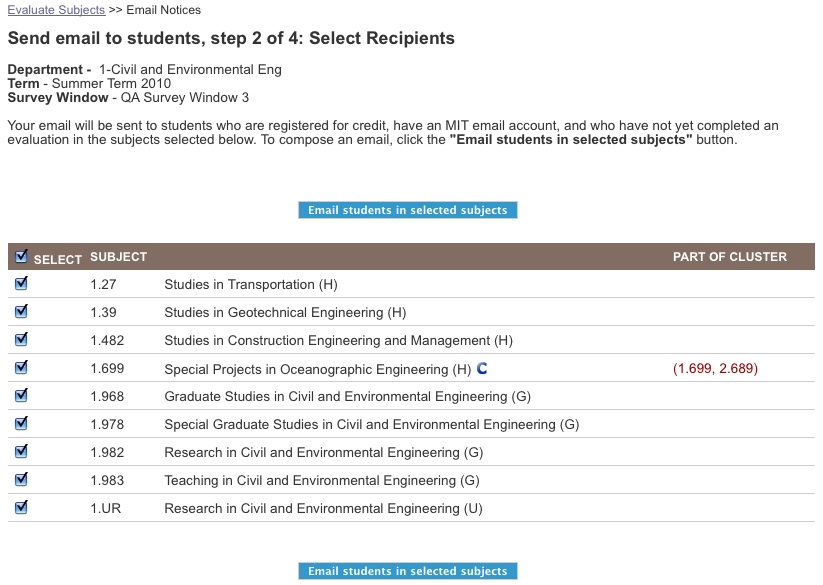
    2. Select your department, and the term and survey window of the subject(s) whose enrolled students you want to send a reminder to. Click "Go." The Select Recipients page displays.

    select-recipients.jpg

    3. Deselect the subjects whose students you don't want to send emails to. (All subjects to be evaluated within your department are listed numerically and are preselected—checkmarks are already present. You can deselect a subject by clicking the checkbox and removing the checkmark. Only eligible students in checked subjects will receive an email.)

    When you send an email notification, all eligible students in all the subjects of the cluster (joint or "meets with" subjects) will receive it, even when the subject is in another department. If a subject is part of a cluster, the clustered subject numbers will appear in the "Part of Cluster" column. "Meets with" subjects that are not the master don't have a checkbox. You can select these subjects by selecting the master. Joint subjects can be selected even when they are not the master, but you should check with the master subject's department administrator before sending an email, to eliminate redundancy.

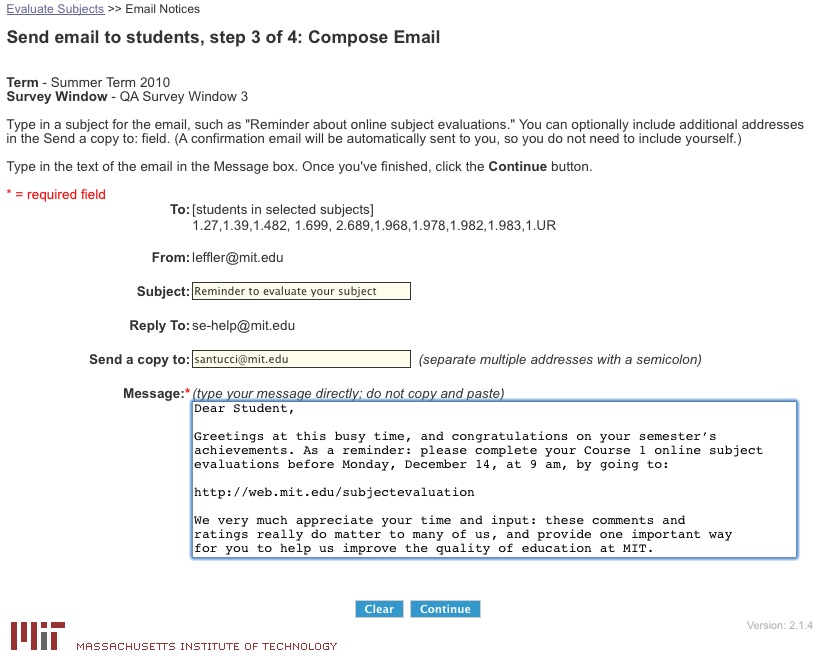
    4. Click the "Email students in selected subjects" button. The Compose Email page displays.

    compose-email.jpg

    The To: field displays the subjects selected on the Select Recipients page. Your MIT email address will appear in the From field.

    5. Type the subject of your email in the Subject field (such as "Reminder about online subject evaluations").

    The Reply To field displays sehelp@mit.edu. This is the subject evaluation help email address. Replies to your email will be sent to this address, and received by staff in the Office of Faculty Support.

    6. If you want a copy of this email sent to another address (or addresses) in addition to the email address that appears in the From field, type the address(es) in the Send a copy to field (separated by a semicolon when there are multiple addresses). A copy of this email will automatically be sent to the address in the From field.

    7. Type your message directly into the Message box. Do not cut and paste from a document.

    8. Click the "Continue" button. If you'd like to redo what you've typed in the Message box, click the "Clear" button. You will need to retype the text in the Subject and Send a copy to fields.

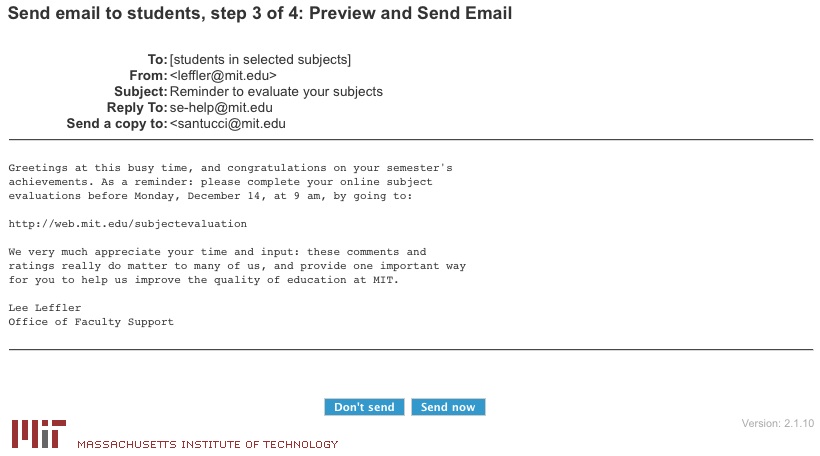
    The Preview Email page displays.

    preview-email.jpg

    9. Review your message. If you are satisfied with it, click the "Send now" button. You will be returned to the Select Department, Term and Survey Window page. The following message appears:

    email-sent-message.jpg

    If you are not satisfied with your message, click the "Don't send" button. You will be returned to the Compose email page.

    10. A summary of your email notification will be sent to you via email, containing a copy of your message text, subject, addresses of those copied, department, term and survey window. Save this summary as a record of what you've sent.

  • 4.9 Composing and Sending Instructor Email Notifications

    You can compose and send email notifications to instructors who will be evaluated. To receive an email notification, an instructor must have a teaching role, be in a valid section (with an approved meet time and location), be flagged for evaluation, have questions assigned to him/her, and have at least one student in their section (if students are sectioned) who is eligible to respond.

    To compose and send instructor email notifications:

    1. On the "Evaluate Subjects" tab at the top of the page, click Send instructor email notification.

    send-email-tab.jpg

    2. The Select Department, Term and Survey Window page displays.

    instructor-dept-term-window.jpg

    3. Select your department, and the term and survey window of the subject(s) whose instructors you want to send an email to. Click Go.

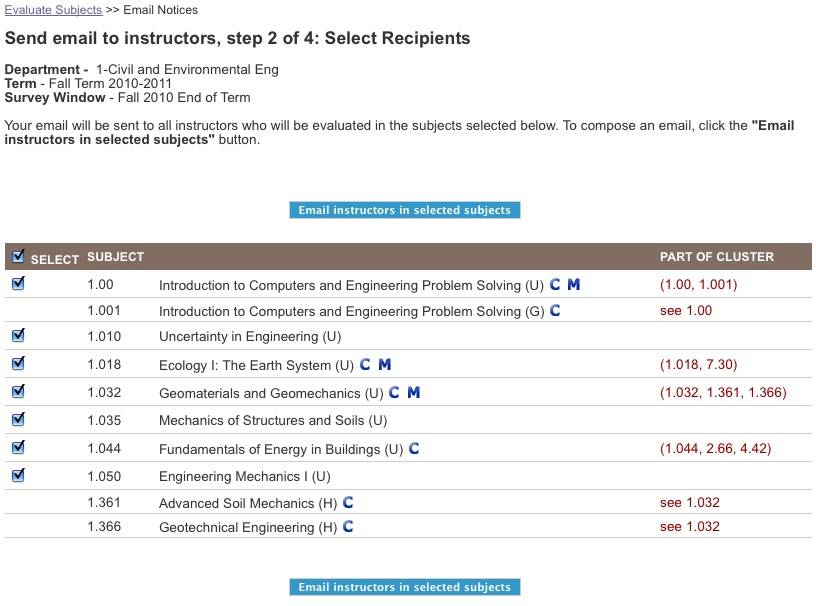
    4. The Select Recipients page displays.

    select-instructor-recipients.jpg

    3. Deselect the subjects whose instructors you don't want to send emails to. (All subjects to be evaluated within your department are listed numerically and are preselected—checkmarks are already present. You can deselect a subject by clicking the checkbox and removing the checkmark. Only instructors to be evaluated in checked subjects will recieve an email.)

    If a subject is part of a cluster (a joint or "meets with" subject), the clustered subject numbers will be appear in the "Part of Cluster" column. "Meets with" subjects that are not the master don't have a checkbox. You can select these subjects by selecting the master. Joint subjects can be selected even when they are not the master, but you should check with the master subject's department administrator before sending an email, to eliminate redundancy.

    4. Click the "Email instructors" in selected subjects button.

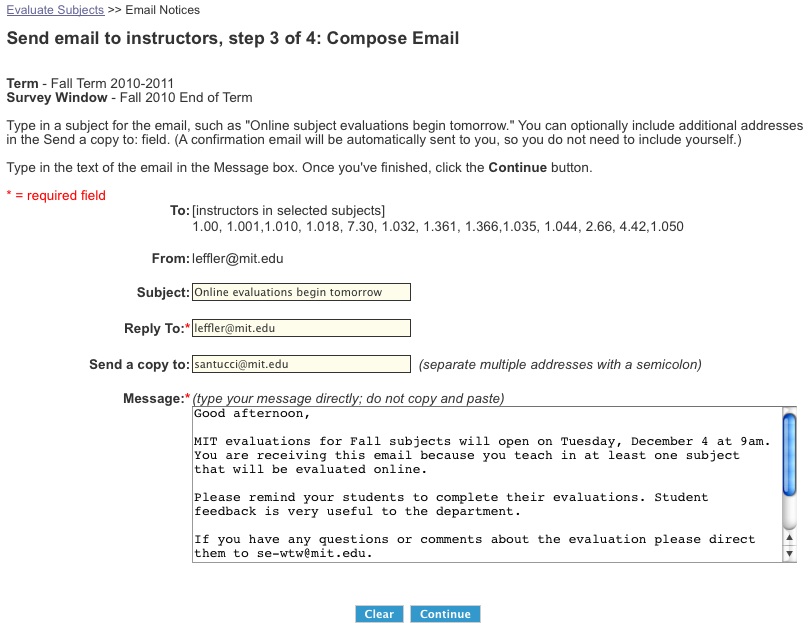
    5. The Compose Email page displays.

    compose-email-instructors.jpg

    The To: field displays the subjects selected on the Select Recipients page. Your MIT email address will appear in the From field.

    6. Type the subject of your email in the Subject field (such as "Online evaluations begin tomorrow").

    The Reply To field displays your email address. You can change this email address if desired.

    7. If you want a copy of this email sent to another address (or addresses) in addition to the email address that appears in the From field, type the address(es) in the Send a copy to field (separated by a semicolon when there are multiple addresses). A copy of this email will automatically be sent to the address in the From field.

    8. Type your message directly into the Message box. Do not cut and paste from a document.

    9. Click the "Continue" button. If you'd like to redo what you've typed in the Message box, click the "Clear" button. You will need to retype the text in the Subject, Reply To, and Send a copy to fields.

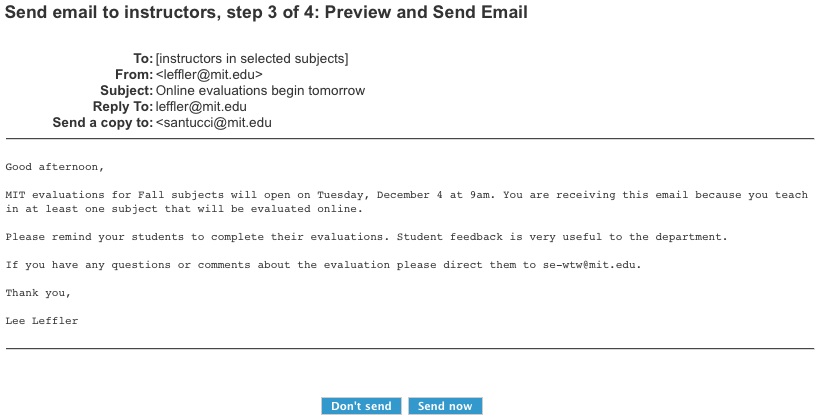
    10. The Preview Email page displays.

    preview-email-instructors.jpg

    11. Review your message. If you are satisfied with it, click the Send now button. You will be returned to the Select Department, Term and Survey Window page. The following message appears:

    email-sent-message.jpg

    If you are not satisfied with your message, click the Don't send button. You will be returned to the Compose email page.

    12. You will receive, via email, a summary of your email notification with an attached .xls file. The summary will contain a copy of your message text, subject, addresses of those copied, department, term and survey window. The .xls document will list the names of all instuctors who received the email notification, with corresponding Kerberos IDs and subject numbers. Save the summary and attachment as a record of what you've sent and who received it.